Download PDF version: 
The intro was born in a strange way. I was seriously lacking time in 2007 (I was immersed in some major house renovations and therefore I didn't want to make a complex intro, just another one of the "kinder" series (like Kinderpainter and Kinderplomber). I actually started by renaming the Kinderplomber folder to kinder_something and decided to replace the tree mesh with something else and animate it (yes, the obvious step to follow indeed). I modeled a hand, put it into the intro, subdivided it and started to add some procedural animation to the fingers.
Getting to work
Then I played around for several minutes and got some nice things with a few smoothstepped sine waves to select the finger and some Perlin noise for the movements. But then I wanted more control, so I started to pick coordinates in Maya for better control. I took coordinates (manually) on the joints along the interior of the fingers. That way I could calculate the distance from each vertex to each line and determine that way which vertex belonged to which finger (to the one with the smallest distance, of course). This was very similar to the automatic vertex weighting algorithm I made two years ago, so I decided to go for a skeleton to drive the vertex movements instead of procedurally animating each vertex.
"I hoped the butt would catch enough
attention to make people forget about
the missing arms."
|
Since I cannot export skeletons in my current Maya exporter, I placed few spheres on the approximate joint positions, wrote down the coordinates from Maya, and constructed the skeleton directly in the code of the intro based on these coordinates. At this point the code was already far beyond my original idea of making a kinder_someting, but I decided to continue.
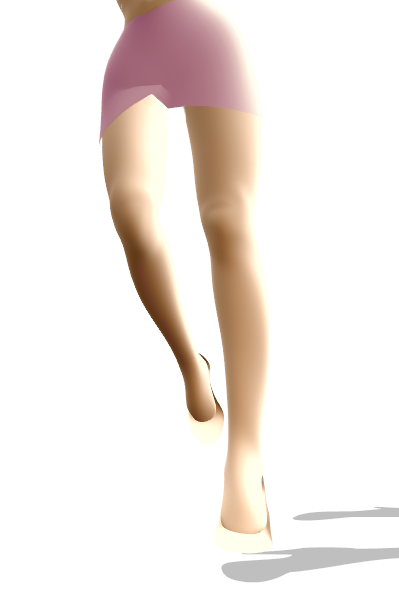
When I got the skeleton working I realized the whole thing would never fit in 4k. The mesh for the hand was far too big, so I thought I had better change the model. My modeling skills are not good enough to build an articulated low-polygon object myself, so I took the only 3D model I had on my disk - a woman that Marius/rgba made two years ago. Incredible or not, I thought I could make her fit in less polygons than a 3D hand if I could place the cameras in a way that feet, hands and face (high polycount elements in a human body) could not be seen by the viewer.
The problems of cutting a woman in half
After toying around with the model in Maya I decided to directly cut the model in half and discard the upper part of the body. This would help in three aspects:
1. Obviously, it would reduce the polycount. I also cut off the arms, which affected the animation in a negative way. I had the strange feeling that something was missing, of course. When I noticed it I decided not to care and hoped the butt would catch enough attention to make people forget about the missing arms.
2. Removing the head of the girl definitively helped in the regard that it's not an easy task to make a believable, emotional facial animation in 4k.
3. Lastly, showing only half the woman creates a mystery around her - everybody wants to know more about the secret Stiletto woman's identity.
However, even though I decided to keep her identity secret, I chose not to do so with her personality. She's a sexy woman, shopping addict, clubbing fan. I decided to look for some module from my (for obvious reasons, unkown) old FastTracker II activity (iq54.xm, actually, made 7 years ago). After replacing the original samples with the ones in gm.dls, in the end only the bass rhythm was reused. But well, everything was in place, the code, the model, the basic sound, and an idea connecting everything together. I renamed the "kinder_something" folder to "Stiletto". It was time to make an intro!
Come on baby, light my fire
I had to remodel the mesh to dramatically reduce the polycount, since Mario's model had 2500 polygons. That's fine for a 64k intro, but definitely not for a 4k. This was a very interesting process. Three days of filling holes, moving triangles through the topology to make quads out of them, and of course lots of vertex merging. Quite an "automatic" process I must say, very relaxing, with good music in the background, and it's a nice break from the difficult personal things going on in real life.
When I thought I was finished with the task, I went back to the code, and realized I was still over 4k, with neither shoes nor clothes so far. I optimized the sound player but I was still at 4k1. I added the shoes anyway, I decided to care about the size later. I added support for more than one material, and started with the lighting/shading. There was definitely no room for shaders, but I still wanted a non-phong-like rendering for the skin. The main component I wanted was the fresnel rim lighting (fake subsurface scattering). I got it by using a very negative specular reddish component on top of a completely over-saturated diffuse and ambient component. If you place the light at the camera position, the negative specular creates the highlights on the borders of the 3d model. Perfect. I was one step closer to achieving my goal.
"Thank you, Microsoft; don't let anyone tell you
anymore that you don't help the scene."
|
When real life chimes in
At this time we got a water leak in one of the heating pipes. The only single room in the flat where renovations were finished was suddenly inundated, so we moved the computers to the bedroom that still was firmly in the "work-in-progress" category. Removing the recently installed Ikea wooden floor to avoid it rotting took three days. Once in the bedroom, I started modeling the clothes.
A failed attempt to create a skirt.
I tried out a skirt first, which was a good idea considering low polycount was needed (I could indeed remove all the polygons behind the skirt). However the skirt was not working well with my automatic vertex/bone weighting algorithm (at least without introducing 150 additional bytes), and I had some ugly animation in the vertices close to the middle on both legs (quite like in TBL's Suicide Barbie), which was completely unacceptable. I tried long trousers but it was far from looking sexy. I made a shorty by splitting the polygons of the original undressed mesh through the correct edge rings. That worked fine and I loved the idea. At this moment the intro was still over 4600 bytes.

My skirt in Maya.
Size matters undoubtedly
It was time to do something about this size problem. 4k6, and still one more material, music, text, cameras and synchronization to add! I once heard that DirectX DLLs had lot of cool stuff inside. I was using gm.dls for the sound, so I would not start a philosophical discussions with myself about the pros and cons of external DLL files. And indeed, I found some nice things in there. Quaternions, matrices, skinning, mesh normalization, subdivision; Whoa! I mean, why on earth did Microsoft put all those things in there!? This was a surprise to me. But only the first one - the rendering api was so nice, so well thought through, that it took only two hours to port the intro, without further reading the documentation at all. All the function names, methods; so simple and straightforward. Well, the thing is that I started to delegate as much functionality as I could from my ex-OpenGL intro to the DirectX DLLs. In two days I was back in business, with my intro within the 4K limit again. Thank you, Microsoft; don't let anyone tell you anymore that you don't help the scene.
Take a walk on the wild side
So here I was, knowing that the animation still had to be done. A walk cycle was the bare minimum I needed. I first got the joint coordinates like I did for the original hand - placing spheres in Maya and annotating the coordinates. I googled for "walk cycle" images and took one as reference that contained 4 keyframes. I manually identified the rotation curves for each skeleton joint by visually inspecting these four keyframes, and with the help of a pencil and a sheet of paper.
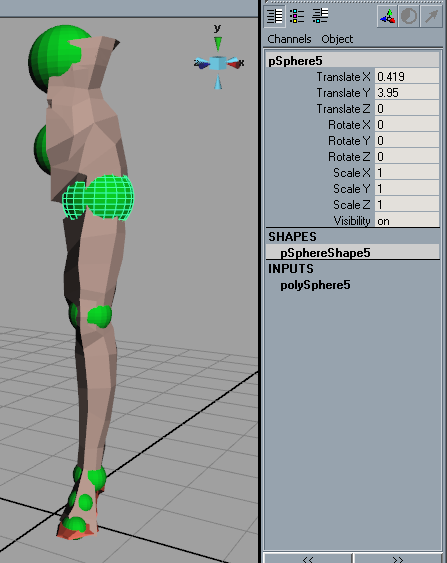
Manual bone coordinates by sphere placing in Maya.
I matched them to basic cosine functions and went back to the C code. It took one hour to fix all the sign and phase problems of the cosine, and one additional hour to tweak the formulas to give more natural movement to the legs. The tuning was basically making the curves more choppy, what I first did by squaring the cosine (after properly offsetting them to 0-1 and postoffsetting them back to -1,1). Squaring was making it too unrealistic, so I ended up blending the pure cosine with the squared cosine at 50%. I also introduced a bit of rotation on the hip for a more feminine walk cycle (butt going up and down), and I also biased the quaternions a bit so her feet would slightly move inwards with the same purpose. 4300 bytes, total.
Thanks to this and the slow plumbers I had the time to make Stiletto
The Belgian bureaucracy is unbelievably slow, and even the most simple task of fixing a pipe leak takes two months (especially during the summer), just so you know. And since the computers and beds where in the bedroom, I could also not continue sanding the walls. So, I had the time to continue. I was in luck, scene-wise at least.
300 bytes are too many bytes to remove just by optimizing the unoptimizable, so I had to do something on the model. This time it was more difficult, though. After the change to DirectX, modeling was a real pain. Let me explain. In my original OpenGL intro, I was manually doing Catmull-Clark subdivision, while with DirectX I changed to the building DX subdivision code plus some manual mesh smoothing (quite smaller than the 400 bytes of the CC subdivision). As a side effect, my "subdivision trick" was not matching the one of Maya anymore as it did before. Meaning the mesh I was modeling in Maya had nothing to do with the 3d model rendered on the intro. So, this last process of simplifying the mesh further was pure, true, hard, slow work. It took another four days in total for around 40 vertices. The process was as follows: after removing faces, vertices must be repositioned, so first pick a vertex and move it. Next, export and include the data arrays in the C code. Recompile, execute and gather some visual feedback of where the vertex ended up. Back in Maya, move the vertex a bit more, and start again.
On top of this, a second difficulty was making the process even worse. The aggressive vertex quantification of my compression system was basically canceling many of these small corrections I was doing in Maya. I was sometimes doing, say, 3 or 4 iterations on my painful modeling->exporting->compiling->watching pipeline with no apparent effect on the intro, and suddenly the next one was making a big difference. Well. The discontinuities introduced in the mesh by splitting it into materials introduced serious cracks in the intro rendering; some of them I could not completely remove or hide and they can still be seen in the final intro.
On top of that, each time I removed a vertex, the topology was changing, of course, and thus my mesh compressor was following a different path down the triangle strips or tree, so all my triangle attribute ranges used in the material assignment were messed up. Finding them again was like finding your shoe at night.
These four days of work were something my health could afford and my mind actually seriously needed. I listened to some more house music during all these processes, enjoying it after all, and thinking about what was coming next. The fun part was about to start.
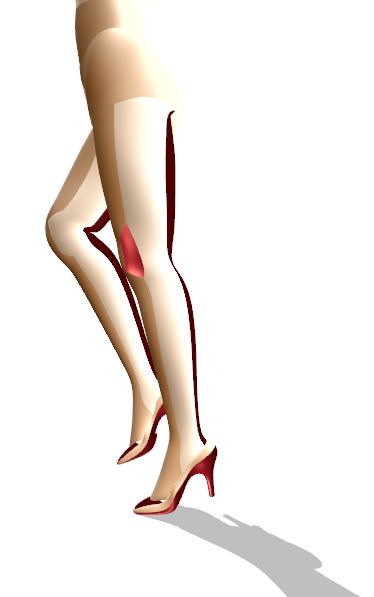
The process of assigning attributes to triangles
The pieces are coming together
The animation, mesh and shading was finalized, and I was within the 4k limit again - so now it was time to make the real thing.
"The very same week that I completed Stiletto,
my girlfriend gave me the last kiss."
|
I opened Milkytracker and wrote some kind of music based on the rhythm of iq54.xm. I went the easy way here; few obvious sync points, and something repetitive that could compress well. I also tried to write something that suited Stiletto, and that was doable with my limited musical skills. Then I took some camera positions by moving the camera more or less randomly and breaking the execution when I found a nice position. I checked the variables and stored the values. Then I added some DirectX text in various places, and the intro was more or less done, except for some minor details. However, I was over 4k again. One week or so of further optimization awaited me. I reduced the music player to 200 bytes or so, removed the display setting initialization (yes, the intro resolution depends on the user's desktop setting, but this intro is not fillrate-limited, so who cares), made some magic here and there and did further investigation in the crinkler options. All of this helped to get the intro within 4k.
The very same week that I completed Stiletto, another cycle of my life ended as well. After five years of an incredible relationship, my girlfriend gave me the last kiss.
Go back to articlelist |
